Monday, July 4, 2011

linear capture exercise 5

Exercise:

Taking any Jpeg or Tiff image, and opening it within photoshop, to produce a smooth curve .

First I need to convert a JPeg from 8 to 16 bit.

Open Jpag in image curve . Making the image with a curve as seen here. Darkening the image . saving the image, then re opening, using the curve scale again. This time, bringing back to the original image, surprisingly hard to do. Most I could get was a bright contrasty image . A lot of the finer detail lost, and some noise in the shadow areas.


Friday, July 1, 2011

Exercises 4 Editing

Editing . using aperture 3 mac

The shoot that I had done over the 3 days  in Shenzhen, I have taken 1 set to do this exercise. The set being the day at the EYE OF THE WORLD :
less the photo of the Girl friend still gave 360 images to edit . To see if they are perfect. one must first run them through processing . as raw images do not show sharp, and contrast.
However to quickly select a few. this method showed to produce good results.

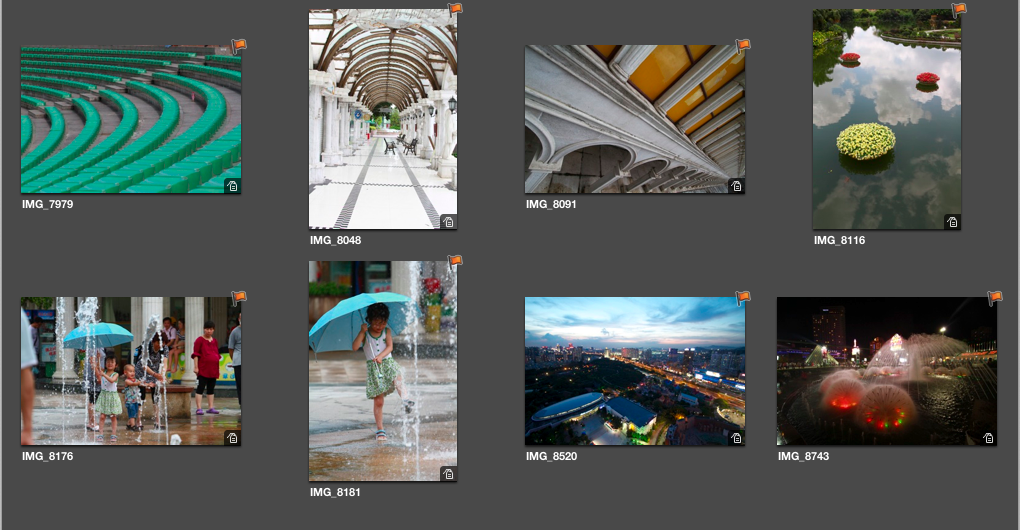
Producing in aperture 3 the following contacts . 


Editing step 1 

from the above sets . I removed 34 that are either un sharp or not worthy to look at. 

Editing step 2 

Going through the remainder photographs selecting from the fist selects to narrow down to a few that will be the bast from the batch (selects)

Editing step 3   

Here I will work through the above to find a  few that stands out from the above 


After loading this up Off to take a break to re fresh my mind . 

Editing step 4 

To narrow down the selection again .


This is not to examine or portray the eye of the world. if the project was for that. My choice would be different .

Now I have to make a choice to show my creativity for publication. 

Only to photographs to be used
this is my final selection.:

This is difficult . i asked 3 people two came with the same select , the other towards the same and my view . That is ?
Top right 8743
We all like the little girl in the water . Both in fact. However , they may be candid , but not creative. 
Arena seats top Left shows an interesting pattern with the eye focusing to the cocacola bottle . 7979.
The Arches 8048 gave a nice tunnel composition . The two night images are attractive. the Fountains have a nice composition leading round from the right to the back. With rich colour. 

Nevertheless ; neither yielded  that odd angle and creativity, So my choice are these two. 


The above Creative as to the intent when i took and composed the image . Waiting for the wind and cloud to position  the floating flowers in the right place . using the law of threes. using a triangle composition. So that the eye leads left to right moving to the back of the picture. being lost in refection. 
  

This image also intent to be creative to the fullest using a super wide 10mm lens . Filling the frame with the wall moving from corner to corner of the frame. with a boy at the end of the wall as a focal point. 
stopping down to give as much depth as possible.

Tuesday, June 28, 2011

Assignment 1 WORK FLOW

Gary Bridger Work Flow.


  • ASSIGNMENT
Street photography.
Subject: Raya market, Gaya Street:
Points of interest: People and food.

  • EQUIPMENT PREPARATION
Select and pack cameras and lenses.
Format cards and charge batteries
Pack pen and notebook.


Once the photographs have been taken:
  • WORK FLOW

Import images from card to mac Aperture 3.

Process raw. Adjust sharpening, contrast etc

Select for This blog
Assignment, stock, And Select for Album up load .

The work flow:
 I then import the images from the memory card to the computers HD using aperture 3 . This software is easy to use. As soon as the photographs are loading, you can view them. Once loaded. Aperture gives an option to save or delete from the card.

I normally leave them on the card as support for another back up.

Once imported, I can then get to work on the images.

1. Burn the whole set to DVD for back up. Save by backing up, using TIME MACHINE. Macs own back up program.
 I prefer to do both. I can then work  the raw photographs. Aperture is set to editing the raw image. However Aperture does not over write the originals. It saves the master images.
Once edited, and those I do not want, are saved to the trash. I will then separate to another folder , or tag those I want to use.
I will re look at the deleted set in the trash. To make sure I do not want these images. Before permanent deletion. In saying this. I always have a back up on disc.

Then I will re assess the work I have edited. Then make my final selection. By holding command clicking on the images I want to send to a file, that I can up load from. Open Export, selecting file type and size. From that file. I name the file to export to. I can then open  any program, that will import or up load the files.

In aperture I can also select the required images as above, Then go to a plug in.
Thats an additional program inter phasing with aperture.   Eg Face book or Fickler. The option will open to up load automatically to the desired web site.
If other editing, or more advanced editing on any image is required, I can open them from within Aperture plug ins to photoshop, or Portrait professional.

Everyone has there own way in a work flow. The work flow is not always the same. Depending if the photographs are for this course. Or of the family and holiday events. I will then edit the pictures in I photo, Save then to disk. Any important images or ones that can be used, other then family or snaps. Will be exported to aperture.

I feel after some time using other programs and operating systems. Learning from experience. This work flow form is quick. easy and very reliable. The only draw back I have is internet speed. Being that I live in borneo Malaysia.


Contact of event:


The picture tend not to show true colour when up loaded to here.

Selected photographs for Album :


http://www.diveactive.com/http__www.diveactive.com/street_photography.html

Friday, June 24, 2011

Your own work flow. Lesson 2

Same as before in lesson 1. This time, an open shoot, any subject,  Like a location, holiday, or an event, that the amount  of shots taken are unpredictable. With out using any structured work flow. The taking of the pictures remains open.

A 7 day trip.


Shenzhen http://www.chinahighlights.com/shenzhen/attraction/

Prep same as above. Less the car. 


Equipment small bag. List full range lenses from 10 to 200 mm
gorilla try pod,
Cable release . batteries charged _ charger. lens cloths, and blower.
Torch for night shots as Its a city.
All memory cards formatted ready.

Lap top clear of junk and room for down loads.

The location is unknown to me . So I need to be ready for anything.

My Aim:
To capture the culture and land scape , city , and culture.
Early morning . Through to the setting sun

Work and play, Eating and rest .

Architecture: ( This will be the main focus point ) As the city is well developed.


.........................................................................................................................

Just back from Shenzhen:

Things did not go to plan. First Air Aisa Lost us one night, No Visas , and had to stay over night out side the air port that had nothing that I could find to photograph. Flying next morning . The city had 3 or 4 nice building most we had no time to see. Girlfriend not interested in architecture. The culture,  very modern and boring for china, and so  boring to look at,
so we turned to the Theme parks, I have never been a snapper. And hate snap shots, But pressured to take photos, 'picture of me " here there and everywhere. She asked ,  And thats what the trip landed up to be.

Well as it was meant to be My assignment . I am going to use what I have taken. The culture shows at the parks were nice. Although the most beautiful of them, no one was allowed to take photographs.

So I made the best of what was available:  Even with some pre planning . Events  never seem to go to plan.

Next thing due, was what to shoot . RAW or J Peg . Mostly I RAW, Due to low light, I had to use High ISO and Jpeg to allow fast buffering time.

Final result and conclusion :
If you want to take pro photographs, and stick to a plan . Inform the Girl friend or wife. Even then, take another point and shoot camera. As all you get is"take a Picture of me here " grrrr
Day 1 landed up in city gardens. Not able to speak or read chinese. I was in her hands. Being that she is chinese. And then chinese is not always understood by many chinese.
Photos:
Second day . Location :
The eye of the world. An amazing place . Up the Eiffel Tower to observe and assess the area, and up again at sun set.
The day yielded some interesting photographs, and many photos of the girl friend. Umm.
shot on J peg . Then back to raw. Allot to think about. keeping my eye on possible artistic settings angles  or people.
 The play.
My first chance to use digital in a show with flood lights and action. The H setting for ISO yielded exiting results as it did in the later shoot.


Night shots were wonderful.
3rd day. Shopping. In hope to capture culture . Sadly kayos and jumble . All old culture hidden or built over. A disappointment. So I turned my camera to the modern Architecture.
The afternoon was then spent at the village .

Hanging colour and china lanterns . Although this gave me chance to explore angle . The village was not much and to many repairs, and bins in the way.
So moving in close and separating viewpoints.
We went to a play, So much colour . This was torture, As signs were shown and walked about stating . 'NO PHOTOGRAPHS!"

Over all . A Work flow helps you plan. And prepare, However as I have been an events and wedding photographer before. Be prepared as anything can happen.

Worse thing about open subject photography, and down loading editing on location. You cannot always see the detail and focus . The image is to small. On the other hand, the lap top , Saves space and clears your cards.

But the subject matter being random.  I sooner know whats going on what where and when!

6 x 4GB DVD to back up and save the originals.

The go through them all. Deleting any that are not worthy.

Convert the raw to jpeg  for unimportant work. Save Raw and large jpeg files for post processing.

I like the old saying Make a plan go with the plan.

Just some samples of the shoot over the 3 days.

This was the file folder out lay.


Shenzhen city. 


The Culture  village 

(C)
(C)
(C)
(C)
(C)
(C) For use by the OCA and my use only. 

Thursday, June 2, 2011

Exercise 3 Histogram

The Histogram:

Governing the scale from the average scene, to low and high contrasting scenes .

What the eye sees as an average setting my not be what we get when taking the picture. And depending on your camera setting, with where the meter reads, the exposure also depicts the over all and final image ( the desired result)

Many of the images, where I tried to read the light,  that has a higher latitude . Like with transparency. Digital is less tolerant with high lights. When using spot metering .
Contrasting lighting is often recorded . The Histogram reads this and gives good valuation to the tonal range of the picture.  However; using average metering . The histogram also gives a good guide on where to expose if the result that you trying to gain does not appear to what your trying to crate. EG on the camera High light warning shows a white area where highlights go over the recordable ability of the sensor.

So To gain detail in that area, you may stop down, to aid correct exposure.

Also, this shows where shooting raw and J pag can differ in the amount of information that is recorded.


This is a direct jpag from the camera 


Example of Raw and Jpag:

The two below are from the computer. The Jpag is from the raw image produced by the software.

Unfortunately  I could not up load the raw file to here I have included a screen shot off the Raw images.

left is the Raw. On the  Right = jpag. these two are a good sample to show how a histogram reads contrast and colour.

left raw 

Right. jpeg 

The blues or highlights in the sky, As seen on the top picture, are weaker and lighter. 

To show more extreme examples as part  the exercise. Here is a sample of a low contrast. 1  mid tone average contrast 2 and high contrast 3 each with 1 stop up and 1 stop down from the cameras exposure. P shots in all. Plus histograms. 

Each exposure is 1st exposure = normal. the  2nd under 1 stop and the 3rd over exposed 1 stop. 

LOW CONTRAST 


MID CONTRAST 


HIGH CONTRAST 


 Noticing  right away how the camera's highlight warning, flashes a black area, pointing out where high lights burn out.
I see how watching the Histogram The values of the intensity can be pulled back, by underexposing.
Rendering richer colour and a more even exposure.

So this is like using a hand held light metre, with out having to move in to evaluate the scene. And by using spot metering, can gain more accurate exposure.