Wednesday, July 6, 2011

Exercise 9 Scene Dynamic range

In this exercise, I am required to take 5 different scenes , Doing the same as before, in the last exercise. But one picture must have highlights, (high dynamic range ) And the other showing one that is flat. (low dynamic range.)


Any scene will do for the rest.

 Exercise 8
I cant help thinking , that the 400d s Dynamic range is not so good in the lower range to record detail, Where as the 7d tends to burn out high lights, Hens, the reason it has a highlight clipping mode .

Conclusion:

Most certainly, there is more to digital then meets the eye.  So In future I must remember, when setting up the 400d, to open up a stop. bracket , this will be to allow detail in shadow areas,  And stopping down, I found with the 7D

Not all camera are the same.


fist low light

1/80 f5,6 ISO 200 
 second high light
Even ditail in High lit area of intens light get washed out and become hazy.


!/80 F 14.ISo 200 

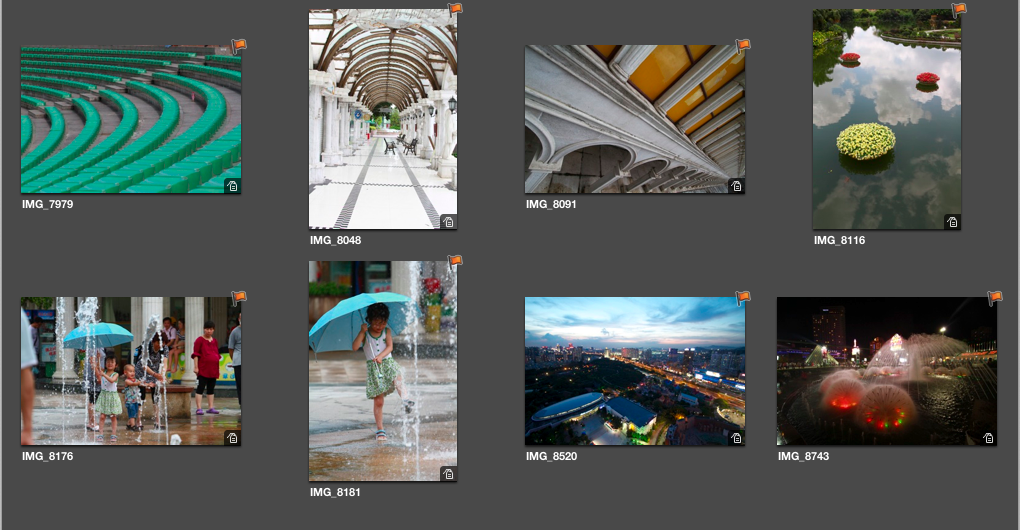
 The next three are and average of lows and mid rage and a hint of high dynamic range.


1/80 f 5.6 ISO 200 
Some noise , just slight is fund at 1005 magnification in the shadows of this pot and upper left side.  


1/80 f4.5 IS0 200 


1.80 F5.6 ISO 200 

Moving in close and taking an exposure, assures that the range of shadow area retains detail . Providing the highlights do not burn out. Using the TV mode keeping the shutter the same. You can see how much the F stops differs from the above.


Exercise 8, Cameras Dynamic range.

To find a scene , that shows an Area of dark shadow. like a wall or house with a door way sun lit from the side. Showing the white of a sheet of paper, or white wall. to make an exposure and adjustment, to show detail. And the effect of noise.

Even looking for just the dark shadow with cream ir dirty walls or another colour , absence , where there would be darkness, there it light. Even in the day Due to the building, facing away from the sun, interiors are badly lit inside.  Doors either closed. . Or as I was putting white paper up. I could up set locals due to superstition.

This exercise will have to wait , when the time is right.

Day 4 much later. Morning walk , round the village. Yielded nothing. Then I thought about my last assignment. A dark window. the light does not fall on it but the wall next to it.  I went back at 5.30pm To observe the light .

Great !. I stood back taking in the hole image. 400 d camera set as asked .

 1/80 sec F6.3

Here in the above photo, in aperture 3, I zoomed into the dark shadow , opening up the exposure in aperture. I could not see any detail, Slight noise . But lost all high lights on the right. 

1/80 F6.5
Same here.  To expose for the shadow, I had should have use a try pod. .  Setting up in the heat and fast dropping sun , I would have lost any light in doing so.  However . Same result as above. 

 1/80 sec f 20

In this image,  I have filled the frame and exposed from the white paper. As you can see, with an average exposure, the highlights have kept there detail. 

These are the shots and exposures taken for this dynamic range .

I am going to have to do this again on my 7d when I get it back from repair. As its the most used camera. I have , so i can find its dynamic range too. 

In observing this use of digital.  The previous exercise on highlight clipping. 
I now understand why my photography previously has lacked that punch and colour saturation. 
This has shown me how making sure that highlights hold detail, and the shadow areas can be opened up. With balancing the highs and lows . An even controlled balance can be achieved. 

Although the high lights do not show noise. A close watch on nose in the darker areas should be watched, when making adjustment. So as not to destroy or confuse noise with real detail. 

Tuesday, July 5, 2011

Exercise 7 your tolerance for noise

For this exercise , I have taken the flute from shenshen and laid it on a wooden plate mat away from the window  the weather is very over cast. So I am getting some nice low side lighting. I often look at the light falls on objects here.

Setting the camera up on a try pod with a 60mm macro lens. Setting the ISO at 100 to start. Un like film cameras there are Many ISO settings. the highest speed i could obtain here was 0.3 sec f 2.8
Setting the exposure at fist to

i have not used raw for this exercise .

Going through the scale from ISO 100 , 125,160,200,250,320,400,500,640,800,100,1250,1600,2000,2500,3250,4000,5000,6400,12800,

I think with to day improvements , hight ISo over 800 now yields better results then fats film . however now we are looking at ISO 12800 and above . Image capture has boundaries never imagined . but with the noise setting in over the 800 ISO mark as seen here . for crisp sharp images . keeping to under the 800 ISO is a must.

Below is the close up at 100 ISO


here is a close up at 12800 ISO


In observing this .  As the exercise stated . if the speed exceeds 1/2 sec exposure . On previous long exposures . another kind of noise takes over. 


i have added this , and in doing so noted how dramatic change set in at 1250 iso however after is backs off and then sets to be more visible 1600 . I note also some colour cast in the lower ISO a magenta in the whites where as moving up. The wall becomes whiter.


high light clipping Exercise 6

 After going through the exercise on linear capture . And now reading this about highlight clipping, I can now see why the debate continues "digital will never out perform film. as the Latitude of film is so much grater. Digital is more like transparency with more limitations. So Technology has yet to over come these hurdles. Some how, I feel we are a long way off getting it right. Even after this course was written. I found the newer cameras are still not what I had hoped, after using medium format. Im a Fool for selling mine at the time.

The 7d I am now using. So much highlights are lost . Reading through. I have come to terms that when photographing with digital. The rules are some what opposite to film . Especially Black and white.

In black and white . The old rule of thumb , was to expose for the shadows letting the highlights look after them selves. However , here we need to expose for the highlights.

Here I have taken a picture, a side look of a work top. Exposing  correct exposure.  Then 1 full stop open, then stopped down 1 again 1 and then again 1 stop down :


starting at F 5 1/8 sec 400ISO
 1 stop up F4
 1 stops down 5.6
 2stops f8
 3 stops down F10

Depending on how much highlights are in the scene . I note that the top picture, highlights or white areas have lost all detail. Average exposure still lacks detail on the second photo. By stopping down 1 stop . This holds details and colour . 2 stops down, still holds detail in the highs and the lows shadow areas . 3 stops down, and shadow areas starts to lose detail. 

Monday, July 4, 2011

linear capture exercise 5

Exercise:

Taking any Jpeg or Tiff image, and opening it within photoshop, to produce a smooth curve .

First I need to convert a JPeg from 8 to 16 bit.

Open Jpag in image curve . Making the image with a curve as seen here. Darkening the image . saving the image, then re opening, using the curve scale again. This time, bringing back to the original image, surprisingly hard to do. Most I could get was a bright contrasty image . A lot of the finer detail lost, and some noise in the shadow areas.


Friday, July 1, 2011

Exercises 4 Editing

Editing . using aperture 3 mac

The shoot that I had done over the 3 days  in Shenzhen, I have taken 1 set to do this exercise. The set being the day at the EYE OF THE WORLD :
less the photo of the Girl friend still gave 360 images to edit . To see if they are perfect. one must first run them through processing . as raw images do not show sharp, and contrast.
However to quickly select a few. this method showed to produce good results.

Producing in aperture 3 the following contacts . 


Editing step 1 

from the above sets . I removed 34 that are either un sharp or not worthy to look at. 

Editing step 2 

Going through the remainder photographs selecting from the fist selects to narrow down to a few that will be the bast from the batch (selects)

Editing step 3   

Here I will work through the above to find a  few that stands out from the above 


After loading this up Off to take a break to re fresh my mind . 

Editing step 4 

To narrow down the selection again .


This is not to examine or portray the eye of the world. if the project was for that. My choice would be different .

Now I have to make a choice to show my creativity for publication. 

Only to photographs to be used
this is my final selection.:

This is difficult . i asked 3 people two came with the same select , the other towards the same and my view . That is ?
Top right 8743
We all like the little girl in the water . Both in fact. However , they may be candid , but not creative. 
Arena seats top Left shows an interesting pattern with the eye focusing to the cocacola bottle . 7979.
The Arches 8048 gave a nice tunnel composition . The two night images are attractive. the Fountains have a nice composition leading round from the right to the back. With rich colour. 

Nevertheless ; neither yielded  that odd angle and creativity, So my choice are these two. 


The above Creative as to the intent when i took and composed the image . Waiting for the wind and cloud to position  the floating flowers in the right place . using the law of threes. using a triangle composition. So that the eye leads left to right moving to the back of the picture. being lost in refection. 
  

This image also intent to be creative to the fullest using a super wide 10mm lens . Filling the frame with the wall moving from corner to corner of the frame. with a boy at the end of the wall as a focal point. 
stopping down to give as much depth as possible.