To produce 6 digital images with a common theme .
Each have a different lighting condition.
1 A high dynamic range ( high contrast scene)
2 low dynamic scene (low contrast flat lighting )
3 Low lighting that has a high ISO
4 Mixed lighting conditions , EG day light and incandescent or florescent and incandescent.
1 A high dynamic range ( high contrast scene)
I played with many of the photographs I took and watched how the Histogram reacted when taking the photographs .by not using the high clipping. The picture would be much more of a high dynamic range. Contrasty. By getting it right, then in the software I use, being aperture 3 , Its noticeable how exposure and contrast adjustment swings the colours Left to right in the Histogram.
Mid day photography here in borneo is more then a challenge not just from washed out colours and contrasting shadows , but the heat. So I have taken these photographs, morning and evening. The histogram when taking in the day tents to peak all over. With so much green or in the city reflected white. Finding an even required scale most certainly gave a challenge.
In a High contrast picture like this. The colours are spread across the graph. Where as in the low Dynamic range Low contrast, Where colour is not so strong in pastel come faint low exposure. The colours are pushed to the right side of the Histogram.
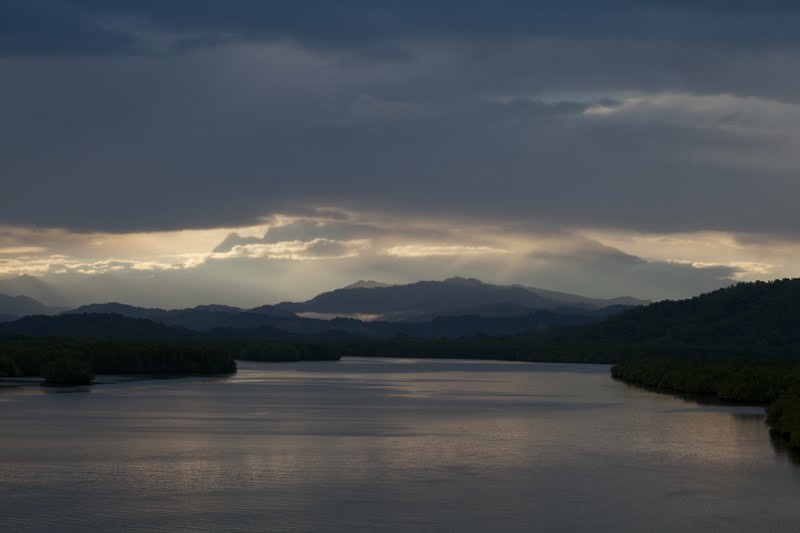
Photo 1
To get these photographs . Allot of thought, and balancing of exposure and light. both vies the camera was set on a try pod. I like to use the lower ISO from 100 to 400.
Tuaran river view of mount Kinabalu Malaysia Borneo.
Taken 6.09 am ISO 250, F11 1.320 sec.
How light changes . Same location as above. But the sun hidden behind cloud gave a much brighter whiter image. Where colour is lost in high Key or Flat low dynamic range , the histogram builds up on the right of the scale. If I had taken the picture more to the right or left , including darker foreground , this effect would have been lost.
2 Low dynamic scene (low contrast flat lighting ):
Photo 2
Taken 6.26am, ISO125 F32, 1/15th sec
This next picture , I took to mix morning light and the street lights. Well lets say highway lights , limited as they are . The clouds giving the highs and the road leading into the lows of the dynamic range . So the colours flow across from left to right of the histogram. little adjustment was needed on contrast and exposure.
3 Low lighting that has a high ISO And a high dynamic range :
Photo 3
Time 6.29 am ISO 400 F9 1/160 sec
3 Low lighting that has a high ISO: Photo 4
Low light with a high ISO 8000 Taken at the Eye Of The World in Shen Zhen View from the Eiffel Tower China.
Again the histogram is pushing the colours to the right side of the scale. Being a little more peaky. This can be changed, as increasing exposure and and lessing the contrast, Or using the brightness. A scene like this can be adjusted to ones liking however , As it is it shows the low light, And the bridge lights showing a filtered effect of the Cities haze. Keeping a nice low key tone.
Photo 4
ISO 800 F2.8 1/30th sec.
4 Mixed lighting conditions , EG day light and incandescent or florescent and incandescent. photos 5 and 6.
Mixed lighting from the same view. day light and the city lights of Shen Zhen.
Here again, the histogram has clearly show the colours moving to the far right.
However , when moving the exposure . The colours do not move so much to the right, but flatten, instead. The sky has become the darker part due to the exposure on the city lights. More to a higher dynamic range. I feel that the sky and the stadium balance , complimenting them selves.
Photo 5
time 7.06 PM ISO 800 F3.5 1.10 sec.
The hardest part of putting these 6 photographs together. With keeping within a similar theme. Was time , weather , location, And getting the camera setting to coincide with the assignment. Creating a diverse collection of images that fall within the histograms Highs and lows. As many photographs , depending on the colour range. The Dynamic range: Pushes those scales all over the place. peaking left and right. Bunching reds greens and blues . Not just in one place, or even as above. But like the sound scale from a rock band.
Also keeping the mages interesting at the same time.
This actually was my second attempt . As per the resulting comment from my tutor for the fist submission. The picture were taken in to much low light. And the histograms just was not in the right range. So i have completely re done this assignment.
Mixed light 3: Low light , High ISO
I wanted produce new work, unfortunately the lack of transport and weather went agains me. So here I chose another later taken picture I took for this course in Shenzhen.
This is interesting, Being taken later that evening as you can see from the timing.
The sky looks brighter. Reason being , that to produce the correct exposure for the artificial light in the above picture. The sky became darker. This was the difficulty in timing the balance between the day light and artificial light. This photograph has a more even balance of light across the scale. In colour and light.
As 1/3rd of the image is taken by the sky. where as the above photograph . Only about 1/6 the of the sky is included.
with this photograph. I played with the adjustments. If made any darker . Detail would be lost. If lighter the same in the clouds. Dodging and burning would be required.
Photo 6
Taken at 19.29 pm ISO 800 F 3.5 1/4 sec.
Over all, these tool help balance, or set a targets of the kind of quality in the image I want to portray. From portraits. Street, pets, wild life and more as I have shown here. From the start when adjusting the camera's settings. In the camera, noting the histogram This takes allot of the work out in post processing.
And adjustment in post processing s well, Brings the final image to near perfection. This has made a massive impact on the quality of my photography.